Total Pageviews

Showing posts with label railroad. Show all posts

Thursday, March 30, 2023


A little boredom side project.... 

Micro Engineering N scale Gas Station. This is the complete kit. I've had it for awhile, figured I'd build it for the fun of it. 


Tuesday, September 27, 2022

That thing needs more power!

 I'm off the modules for a few days. Last couple of weekends have been busy so no time. When I pulled everything out of my boxes, I realized I had zip for HOn30 power. So, time to rectify that oversite. 


Building out a pair of boxcab locos on Bachmann MDT chassis. I have a few of these chassis layout around, so I'll probably do a few other locos. Since I don't have a need for bigger power yet, I figured I'd get the yard oxen built first. (Oxen are always pair together. These guys are Frick and Frack.) 

Stryene is a main material. The grey parts are Cannon & Co details. I need some more of them for other parts of the build. The units will be drawbared and electrically tied together with DCC and lights. I don't think I'll do sound. That's still up in the air. 

More to come! 

Monday, September 5, 2022

Update...

 Cleaning up more stuff for future use. Dug out power units to see what I had.. 


The tank in the background is an old Stewart kit I found at a local show. 

Also, I've started building modules for a portable HOn30 layout. The goal is to be under a 30" width, which is standard for show tables. This is a table top layout, kinda like TTrak. Main modules are 9" x 16", the middle, smaller ones are 9" x 13". I plan to connect them with magnets and use Tamiya small connectors for power and lighting. 

The next question is hand laying track and switches or using Peco HOn30 track. I'm on the fence but we'll see. 


More to come...

Wednesday, December 22, 2021

On3 Boxcar Pt3, The body

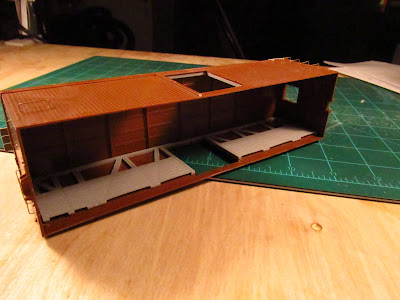
Boxcar body. 

Added grabs, interior boards and the roof walk. I didn't use the provided bending gauge, just measured and bent with needle nose pliers and a Sharpie to mark the bends. 

Next up is probably a primer and paint, then mount the floor inside. 


Wednesday, December 15, 2021

On3 Boxcar Pt2

 Finished the underframe.. 


First time doing truss rods. The warts are all mine. Next time, I may swap them for brass. 

Instructions are very simple. When I build another, I plan to take alot of notes. 

Saturday, December 11, 2021

On3 Boxcar Pt1

It's always interesting to try different stuff. These are the trucks and underframe from a San Juan Car Company On3 DRGW boxcar. An interesting kit. Not for a first timer. 


The trucks are multiple pieces. Wheels roll freely. Regular MEK doesn't really work well with these, but Plastruct Bondene glues everything up wonderfully. 


 The underframe is going together. Need to bend the air lines and truss rods. 


This is a good view of all the parts for the kit. Upper left is a N scale Harriman baggage car for reference. 

Find them here at https://sanjuancarco.com/


Friday, September 22, 2017

Time for a little fun...

I've had this floating around for a little while..


Now to have a little fun with it..

Monday, September 4, 2017

Little things...

Decided to rearrange my shop today. I needed a bigger work area. So in the process of cleaning, I can across these little beasts....


HOn30 gondolas kitbashed from Bachmann N scale cars.

I guess I'm gonna have to figure out a railroad to run them on...

Saturday, January 2, 2016

And then this happens..

Well, I was fine with the idea of an HOn30 layout, until this followed me home this weekend...


Life just got interesting...

The mess in the back is a 1/24th Peterbilt Logging Truck. Pics of that coming soon... 

Wednesday, October 7, 2015

Crane and something new..

Work continues (in fits and spurts) on the Fallberg depot.

I built the crane for the dock. It's a nice little model that will need some detail. The undercoat is Mineral Brown, then a coat of Ammo Chipping solution and then Medium Yellow. The Chipping solution allows you to flake off the paint with a wet paint brush after it has had a chance to dry. I've got the base of it done, just not photographed. I'm going to apply rust and some other washes to it next.


I also got a new toy. I've been considering a fine airbrush for some time and have been looking at alot of the major brands. Iwata, Badger and others were considered. But for the last 30+ years, I've used Paasche airbrushes with no complaints. Parts are easy to get, they are made here in the USA and I've sprayed all sorts of paints with them.

I have had a H model external mix model for all of those 30+ years. I'm on my second one (the first died a horrible death) and it'll spray anything. I bought the Millennium when they released it for acrylics. It too is a work horse. Easy to get a fine spray with.

My new brush is a Talon. Made to do very fine lines. It came with three spray head/needles (0.25, 0.33 and 0.66mm) and a fan cap for wider spray. Best part is there was no need to swap airhoses or buy adapters. And for $100, well worth it. I'm getting used to it but it is very nice!


Okay, enough yaking. I'm gonna go get a couple of washes on the crane before bedtime.

Friday, January 20, 2012

Wow...

Hey everyone! I took a break during the holidays but I've started getting back into the swing of things.

So, having a railroad that hauls lumber means I need some lumber loads. I recently got some Red Caboose centerbeam cars for a good deal on the N Scale Yard Sale list on Yahoogroups. So now it's time to add some lumber...


The loads are balsa wood cut to 12, 16 & 20 foot lengths. The ends are painted and basswood 4x4 spacers are glued in. After the glue dries, the spacers are trimmed and the load is pretty much ready. Basswood could also be used, but my local shop didn't have any that would fit when I was there.

I plan to start some scenery work this weekend, so watch this space!
Published with Blogger-droid v2.0.3

Monday, September 26, 2011

Update.. Reefer madness and cork on the mainline!!!

I know, about time I updated. Well, with my work schedule and other things going on, it's been tough to get anything done. It's also the time of the year when I start woodworking again as well. So, without further ado, on with the update...

Picked up two of BLMA's killer reefers. Train Shack in North Hollywood had several when I was in the area, so I couldn't help it. These are nice. They'll get full weathering and graffiti shortly, but I had to run them. Luckly, the GEHAMS club was having a run this weekend.


I also got the cork down on the upper deck. Next is the track and wiring. Then I'll figure out what I want to do with the industries. As it is right now, I'm leaning to maybe 4-7 various industries. After the trip up north, I'm also going to model more of the NorCal-Oregon area.


I should have it running this week, if I'm lucky.
Published with Blogger-droid v1.7.4

Saturday, September 17, 2011

Okay, layout update....

So here's some shots of the layout. Were starting from the west end to the east end.


This the west end helix. I'm using 2 turns to get the main up to where it needs to be. The reason for the riders being so long is for the climb for the branch line.


This is the bulk of the layout. Stqging is in, but wiring is currently under way. That should be finished by the time you read this. So far, nothing has had a problem.


The east end climb. I planned for trains with 3 engines on the point, or 2 and a rear end helper. Looks like I managed to get that to work without too much heatburn. 3 UP Aces with 26 cars look good too!

Tomrrow, I should start working my way across the upper level and finish the mainline.
Published with Blogger-droid v1.7.4

Monday, August 29, 2011

Round and round...

Well, after spending all weekend finishing off the staging yard, I started on the west loop. I'm figuring this will be a 1 turn helix to climb up to the upper level. I'm giving serious thought to installing the upper section first, then linking the helix up to it. I'm still giving thought to the backdrop as well. Right now the thought is 1x2's off the back and either plastic or masonite for the backdrop.


Published with Blogger-droid v1.7.4

Sunday, August 28, 2011

Staging done!

With a quiet weekend and no obligations, I got to finish my staging yard this afternoon. Now to take a moment and wire it up. Maybe I'll get a train running this week....

Published with Blogger-droid v1.7.4

Tuesday, August 23, 2011

Getting there...

Sub roadbed in.. got some of the cork and track down as well. I'm thinking of a helix on the end to get back to the upper level.


Hopefully, I'll have it up and running by the weekend.
Published with Blogger-droid v1.7.4

Friday, August 19, 2011

Last of the benchwork... For now..

Finally got the last of my benchwork up and installed. Moved the paintbooth to its new home, so now I can get down to finishing the line.


Also, I finished installing the east end of the staging yard. Blue Points are being used for switch control and power routing...

Published with Blogger-droid v1.7.4

Tuesday, August 16, 2011

More benchwork...

More west side benchwork went up today. My layout room is 11' 7" wide. This piece fit managed to fit right in. Now to just finish cleaning up where the paint booth is to move and I'm ready to install the last section.

BTW, yes, that's a wig-wag signal. It's from the Pacific Electric crossing of Alameda street in Los Angeles. One of my projects is to get it cleaned up, repainted and rewired so it can be lit.


Published with Blogger-droid v1.7.4

Sunday, August 14, 2011

East end staging...

Well, the east end ladder is in for staging. Thanks to my buddy Doug for the loan of his compressor, I can get a lot of benchwork done alot quicker..


Now to start installing yard tracks..
Published with Blogger-droid v1.7.4