Hope everyone had a good Christmas. I've got lots of reading material for the new year...
Spent the week working on a couple of small projects in my room to get it ready to move everything. I also started sorting through boxes of stuff. And I have a lot of stuff! But I've decided I'm not going to get to all of these projects, so it's time to clean them out. So now it's either toss junk or sell it and add the funds to the layout kitty. One thing I plan to do is keep some N scale stuff (Amtrak and some freight cars) and get involved with the local T-Trak guys. There's also talk of a Freemo HO group forming, so I may be getting some HO stuff. I think that's gonna be 1950's equipment. And the home layout will be narrow gauge. The boss doesn't have a problem with this, which is surprising.
Anyway, I'm gonna tinker with the railbus tomorrow. Look for an update later this week.
Saturday, December 28, 2013
Friday, December 20, 2013
Poking around..
So I'm still here, with no layout built so to speak. After a lot of thought and consideration, I'd decided that the narrow gauge bug isn't going away anytime soon, so it's time to indulge. I've got time to work on stuff for the next few months, before spring and garden season. :-)
So how about a picture of a rare beast?

So how about a picture of a rare beast?
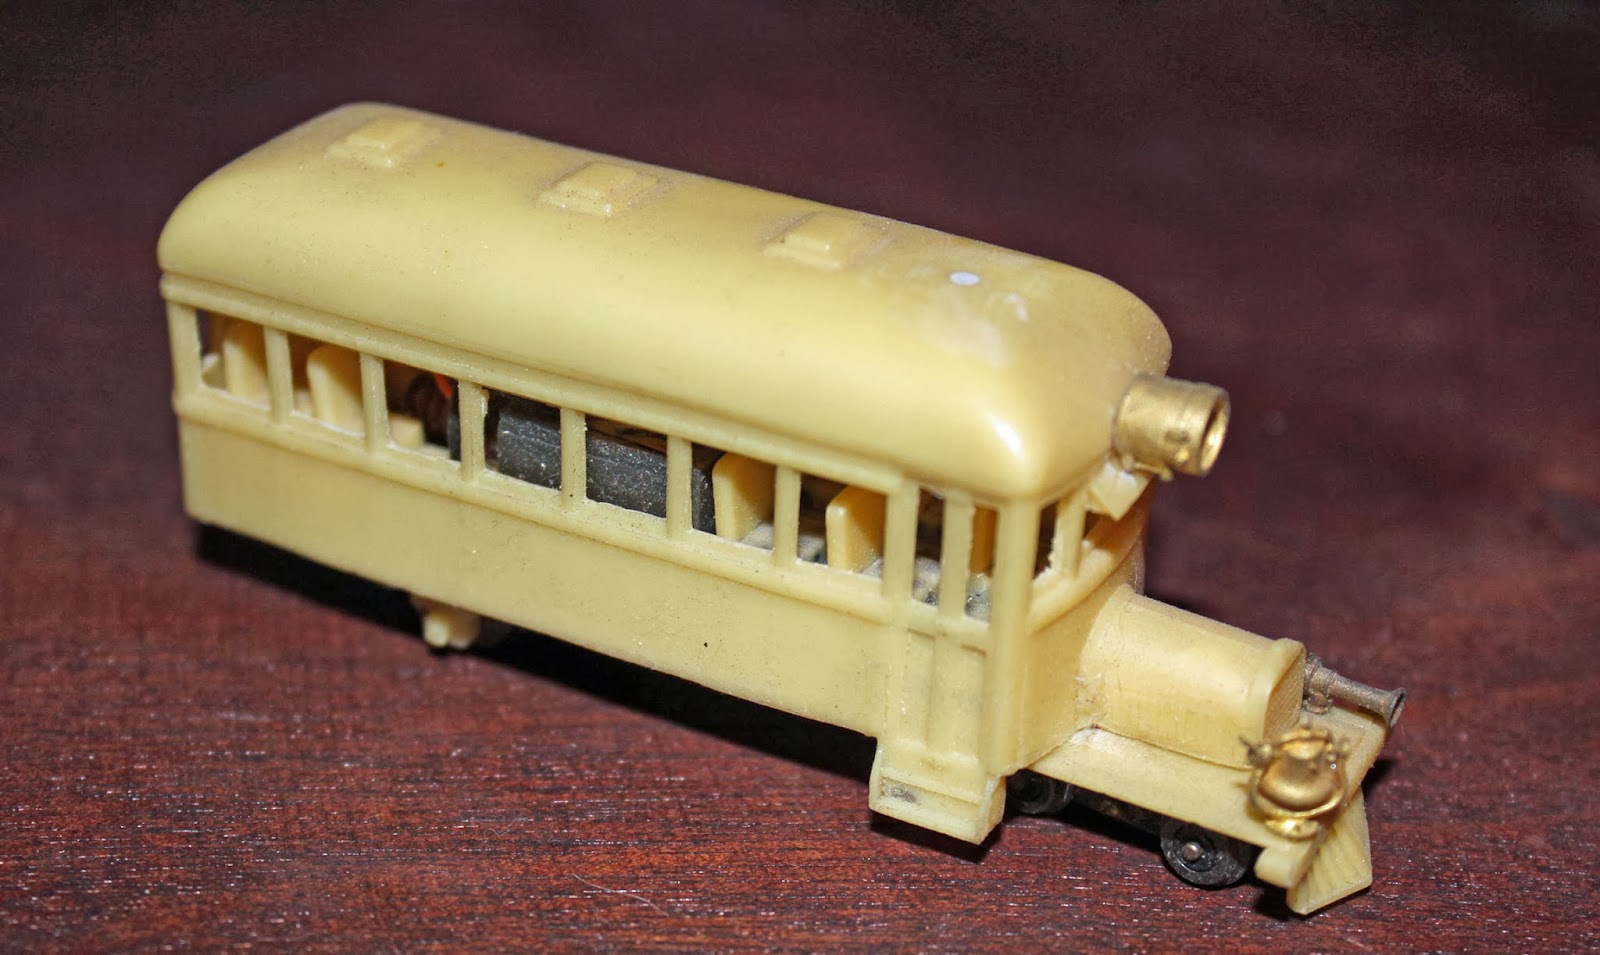
This is a Railway Recollections Railbus. I don't know if Barry still offers this kit, but it's a neat one. I'm not sure if still has the power conversion kit available. It uses the Bachmann MDT switcher motor and one axle for power. I added a Lenz decoder, light and the brass castings you see. I want to add a trailer to it and some more details. Jordan Models has a similar bus kit out, so you may be able to convert it with Barrys power kit. might want to contact him via www.railrec.com
That may be my project this week. I've had this model forever, so it's time to finish it. Okay, time to post and hit the rack. I'm going to try to update this blog in 2014 once a week or so. We'll see how I do.. :-)
Saturday, October 26, 2013
Airbrush booth update...
So after using my booth for awhile, I decided that the lighting inside the booth was just not up to speed for my likes. A single 18" fluorescent light bulb wasn't gonna cut it anymore. Now the question is what am I gonna use?
Well, on a trip to my local hardware big box (Menard's), I found light bulb sockets while looking for something else. That's when it hit me. Two sockets, inside the booth would allow me to install a pair of CFL's. Lots of light!
So out when the old light (attached with chalk) and in went the new lights. I attached them with machine screws and nuts, then wired the whole thing up with a cheap extension cord. Just cut off the multi plug part and use the wire for you project. Some spade lugs were crimped on and the whole shebang wired, spliced and secured with wire nuts. Then I plugged the cord into the outlet for the light and turned it on. 150 watts of light! The photos show the sockets mounted.


I had to add a valance to the booth after the first time I turned on the lights cause they were right on my face. A piece of styrene and some chalking fixed that. Now, I've got enough light to see everything I'm painting without any issues.
The lighting upgrade, depending on where you shop, will run you about $20. Light bulbs will be the most expensive. Here's what I used...
2 standard light bulb sockets
4 1.5" 10/24 bolts, nuts and #10 washers
4 spade lug connectors. I got round ones and cut notches in them
2 6 foot extension cords.
2 wire nuts for the gauge wire the cords are. Usually #16-18 gauge,
2 CFL bulbs. I'm currently using 75 watt cool whites, but I'm going to switch to full spectrum bulbs before too long. You can use smaller bulbs as well. The 75's are bright!
As always, if you are uncomfortable with hooking up wiring, get some help. Always double check everything before plugging it in!
Now that the paint booth is working well, time to get back to modeling!
Sunday, September 22, 2013
Update time...
Wow, where has the summer gone? First day of fall here in Iowa....
Nothing exciting to report model train wise. I've been working on a couple of plastic models and canning stuff out of my garden. However, plans are in process for my new layout. I've got the room figured out and some ideas forming. Now I just need to get to it..
Hopefully some pictures will be posted this week.
Saturday, July 6, 2013
Kate Shelley High Bridge..
I managed to go out and do a little railfanning yesterday afternoon. Drove up to Boone Ia and checked out the Kate Shelley High Bridge. You can read alot of the history here.. Here's a little about Kate Shelley
It's fairly easy to get to, but I had no luck getting a shot from on the ground. I figured out the next time I'll go fishing on the river and I'll catch lots of trains then.


The older bridge is still in place, but not used. The concrete bridge is the newer one.
More later this week.
It's fairly easy to get to, but I had no luck getting a shot from on the ground. I figured out the next time I'll go fishing on the river and I'll catch lots of trains then.


The older bridge is still in place, but not used. The concrete bridge is the newer one.
More later this week.
Sunday, June 30, 2013
Last post for June 2013...
I looked up today and noticed that June is almost over! Holy crap! At least I've got a decent garden in and growing.
I've finished building my new desk that I should have in my office today. That will clear off my workbench for model stuff. The house were in doesn't have a basement in it, cause it's a split level house. However, I do have a room that I can built a good sized switching layout in. So that's the plan right now. And luckly, I've got time in the winter to work on the layout cause the yard will not need my attention. More details to come.
I've finished building my new desk that I should have in my office today. That will clear off my workbench for model stuff. The house were in doesn't have a basement in it, cause it's a split level house. However, I do have a room that I can built a good sized switching layout in. So that's the plan right now. And luckly, I've got time in the winter to work on the layout cause the yard will not need my attention. More details to come.
Friday, June 14, 2013
Moved....
Well, we're settling in our new place in Iowa. Yep, a big jump from California but it's a different world and pace. Not too shabby. Got a few warms days but I've found it's not much different than living on the coast.
We're in Adel, Iowa (pronounced A-del). For those railroad folks out there, the former Milw Road line is easily seen from our upstair windows and is used as a hiking/bike trail now. A couple of industries still stand here in town, one still working.

This was probably an iron/metal dealer that got shipments via rail. Not sure on the name, but when I track down my 1958 shippers guide I will look. The ties and roadbed leading up to it are still in place. I'll take a walk before too long for more photos. It would make a great trackside industry. There's a larger one in Des Moines that receives sheet steel and shapes via rail everyday. I'll get some shots of that as well.

The other industry is a brick manufacturer. The photo shows where the siding went downgrade so they could load the cars. The loading platform is bricks stacked up and them concrete on top. I'll also post up photos of this industry as well. The now ship brick via truck and is very active.
There's also many bridges and what not in town. The former Milw depot is just down the road and used by a law firm. There are also several grain elevators in Waukee that are on the old line. We're going to start biking the line, so more photos of the area will be coming. Lots of good ideas for a shortline!
Sunday, April 14, 2013
Kinda back at it...
Dusted off the airbrush and did some weathering on a future shortline engine. This will be a used loco purchased from the BNSF deadline. Nothing like cheap power. I've got a GP35 that will also wind up being repainted into the shortlines scheme. Now the question is to model a shortline or a regional railroad. Or a freelanced Class 1. Got alot of big 6 axle power that could be morphed into an awesome roster.

Tuesday, January 8, 2013
The new paint booth
Well, for a project that wasn't going to take me long, it was just over a week to get it done..

It's probably the best one I've built yet. The beauty of this on is there is no need to vent outside. There is a filter on the end to catch any over spray the inside filter misses. I also added switches for the fan and lights/compressor as well.
Right now I'm putting together all the instructions for it.
More on it later! I got some models to paint!
Subscribe to:
Comments (Atom)